Applied Pose Estimation in Rowing
I’ve had some exposure to pose estimation at work and had been wanting to try it out on my own. My goal for this blog was to try a state-of-the-art pose estimation on a video and use the data to gain some insight. More specifically, I wanted to use pose estimation to analyze a person’s form on a rowing machine.
Find a Model
Human pose estimation is a well-researched topic, so I searched for an existing architecture and pre-trained model I could use. A popular pose estimation model is the 2018 OpenPose project. The OpenPose GitHub repo is nicely fleshed out with examples and documentation.
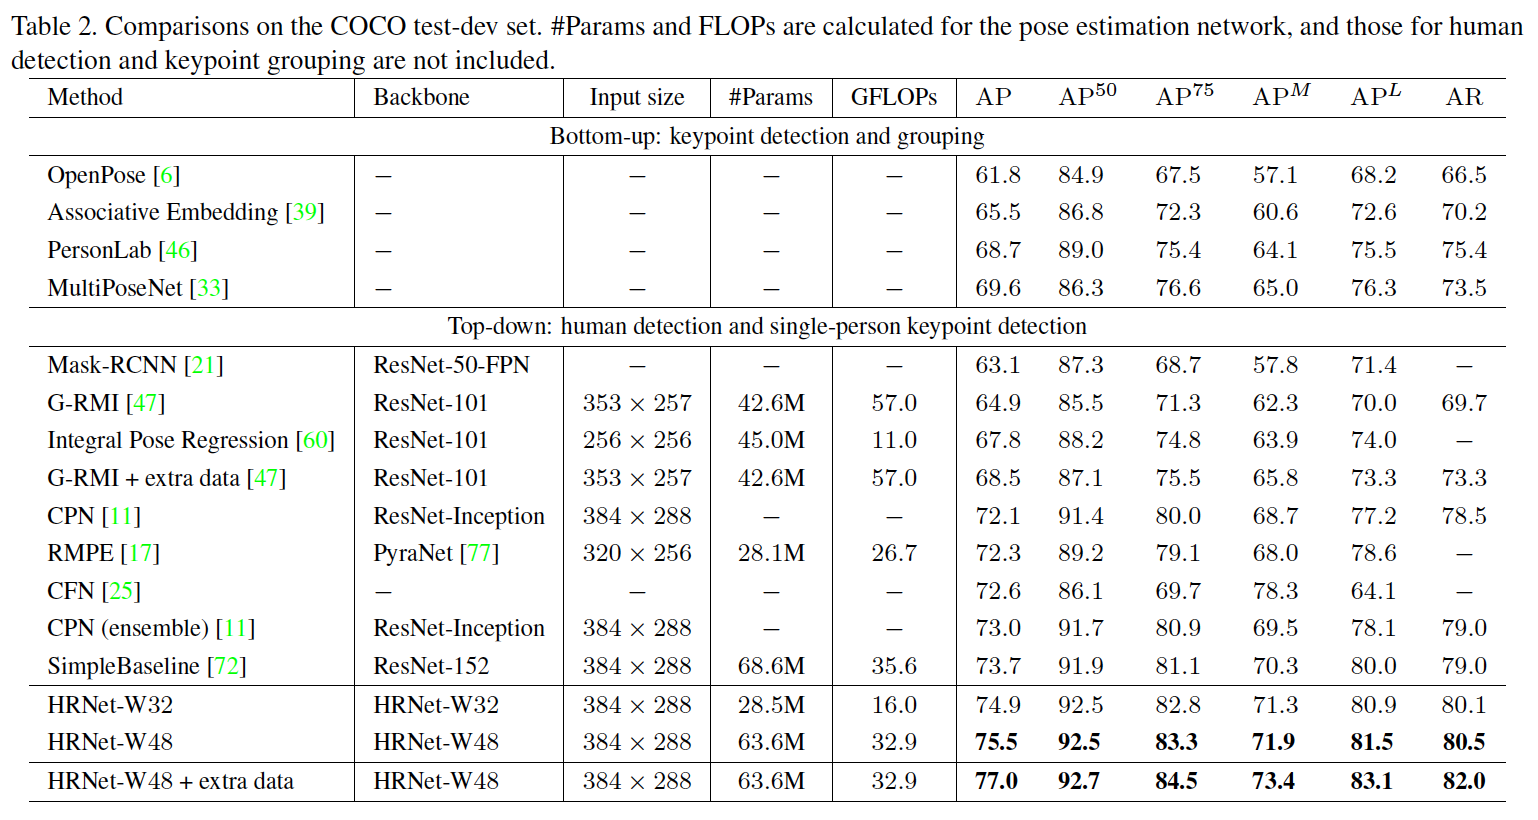
However, in the world of Machine Learning and Computer Vision, 2018 is ancient history! After more searching, I found a new pose estimation accepted by CVPR 2019 called HRNet. HRNet outperformed all existing methods on Keypoint Detection, Multi-Person Pose Estimation and Pose Estimation tasks in the COCO dataset. See the results table below for details. At the time of writing this post, the paper already had 90 citation and the github repo has over 2k stars and nearly 500 forks.
Despite the success and popularity of the project, the repo has a number of issues opened by folks having trouble using the model from the paper in their own projects. After reviewing the issues and struggling to use the model on my own videos, I identified three problems to solve:
- An easily reproducible inference environment is needed (see several related git issues)
- A script to infer on a video doesn’t exist yet.
- Code is also missing for a person detector, which is required as a preprocessing step to pose estimation for images “from the wild” (also has open issues)
I’ll describe my solutions to each of these problems here. All my code can be found on my GitHub.
Improvement 1: Reproducible Environment
I like to use Docker to manage my programming environments. The repo I worked with is a Pytorch implementation of the pose estimation model, so Pytorch will need to be installed on the image. I will also need CUDA and CUDNN to use GPUs, OpenCV and FFmpeg to process video, and several python libraries.
Fortunately, NVIDIA provides a Docker image nvidia/cuda:10.2-cudnn7-devel-ubuntu16.04 that gets me most of what I need.
Beyond that, building OpenCV and FFmpeg in the Dockerfile is well documented online.
With my Docker image, someone wanting to try out pose estimation would simply need to download the pretrained model weights from the CVPR researchers’ site, build the docker image, and run the inference script inside it!
Improvement 2: Adding Inference Script for Video
Reading frames from a video was an easy to implement with opencv-python.
import cv2

vidcap = cv2.VideoCapture(args.videoFile)
success, image = vidcap.read()

while success:
    # do things with image!
    success, image = vidcap.read()
One tricky aspect here is that OpenCV reads images in BGR format whereas most models expect RGB format. Forgetting to convert the image data to RGB can sometimes case dramatic decreases in model accuracy.
I run inference on each image and draw the keypoints on each frame. Each frame is then saved to disk (not optimal performance, but really nice for debugging). Finally, all the frames are stitched back together with ffmpeg.
# args.inferenceFps is an int for the inference frame rate
# pose_dir is the directory
os.system("ffmpeg -pattern_type glob -i '"
          + pose_dir
          + "/*.jpg' -c:v libx264 -vf fps="
          + str(args.inferenceFps)+" -pix_fmt yuv420p /output/movie.mp4")
Improvement 3: Adding Person Detector
The second addition was the person detector. This is where I discovered a torchvision.models! This fantastic Python package lets you download pretrained models with a few lines of code. I used Faster R-CNN pre-trained on ResNet50 as my person detector.
import torchvision;
model = torchvision.models.detection.fasterrcnn_resnet50_fpn(pretrained=True);
model.eval()
Below, you can see how much adding the person detector helps the pose estimation. The top video is the result of running pose estimation on the full frame. The bottom video is the result of detecting Stalone and running the pose estimator on a tight crop of just him.

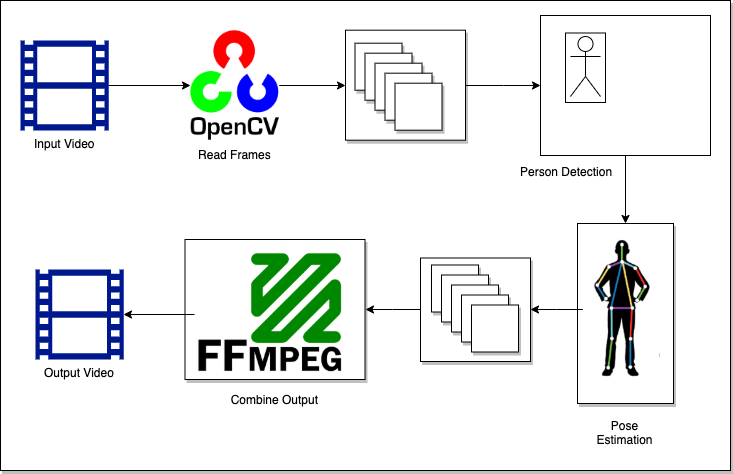
The diagram below shows the full inference process including the missing pieces I added.
Apply Pose Estimation to Rowing
Great! I have an easy-to-use pose estimation setup. The goal that inspired all this work to begin with was analyzing erg technique. The specific aspect of erg technique I am focused on is hand speed. When talking to one of my old teammates who has gone much further into rowing than I ever did, he said “I think that if you could measure the speed of the handle that would be super useful. Then figure out which point in the drive the handle is moving fastest and slowest. Then look at the pattern of dots and figure out which is the individuals strongest and weakest position.
Speed in a 2d coordinate space is easy enough to measure, particularly when I’m not interested in particular units. I solved the problem with my own code. For the speed at point i, I calculate the distance between i and i-1, i-1 and i-2, etc until i-n. Then I divide the total distance by n. The output units are pixels/frame, which is fine in this case.
import math

def get_speed_from_coords(coords_list):
    if len(coords_list) <= 1:
        return 0

    i = 1
    distances = []
    while i < len(coords_list):
        x1, y1 = coords_list[i-1][0], coords_list[i-1][1]
        x2, y2 = coords_list[i][0], coords_list[i][1]
        distances.append(math.sqrt((x2 - x1)**2 + (y2 - y1)**2))
        i += 1

    return sum(distances)/len(coords_list)

def get_speed_list(coords_list, point_window=5):
    speed_list = []
    for idx, _ in enumerate(coords_list):
        end_window = idx + 1
        start_window = idx - point_window
        if start_window < 0:
            start_window = 0
        speed_list.append(get_speed_from_coords(coords_list[start_window:end_window]))
    return speed_list

test_coords = [
    [1,2],[1,3],
    [1,4],[1,10],
    [1,20],[1,35],
    [1,60],[1,100]
]

speed = get_speed_list(test_coords)
print(speed)
# [0, 0.5, 0.666, 2.0, 3.6, 5.5, 9.5, 16.0]
A problem I immediately identified was the impact of false detections. If a single frame suddenly places the hand keypoint by the person’s feet, that will come out as a huge speedup in hand speed. This was a tougher problem to solve, but I found helpful posts by googling for “how to smooth GPS coordinates in Python” or “remove outliers in GPS data.” GPS smoothing is a pretty popular problem and GPS data is basically a set of 2d coords.
The solution I found to work turned out to be easy enough to implement. Each coordinate is set to the median of the 5 coordinates around it in sequence (i.e. itself, the two previous values and the two subsequent values).
import statistics

def medianify_coords(coords_list):
    x_values = [x for x, y in coords_list]
    y_values = [y for x, y in coords_list]
    return [statistics.median(x_values), statistics.median(y_values)]

def get_medianified_list(coords_list, point_window=5):
    new_coords_list = coords_list
    look_back_number = point_window//2
    look_forward_number = point_window-1-look_back_number
    current_index = look_back_number+1

    while current_index < len(coords_list)-look_forward_number:
        start_look_back = current_index-look_back_number
        end_look_forward = current_index+look_forward_number+1
        new_coords = medianify_coords(coords_list[start_look_back:end_look_forward])
        new_coords_list[current_index] = new_coords
        current_index += 1

    return new_coords_list

test_coords = [
    [1, 40], [2, 50],
    [3, 60], [4, 70],
    [5, 80], [6, 500],
    [7, 100], [8, 110],
]

fixed_coords = get_medianified_list(test_coords)
print(fixed_coords)
# [[1, 40], [2, 50], [3, 60], [4, 70], [5, 80], [6, 100], [7, 100], [8, 110]]
I had a grainy erg video from a friend to test the smoothing on. In the video below, the original predicted coordinates are shown in green and the adjusted coordinates are shown in red. You can see when one of the green points goes way off the hand position, the red coordinate for the same frame is much closer to the correct location.
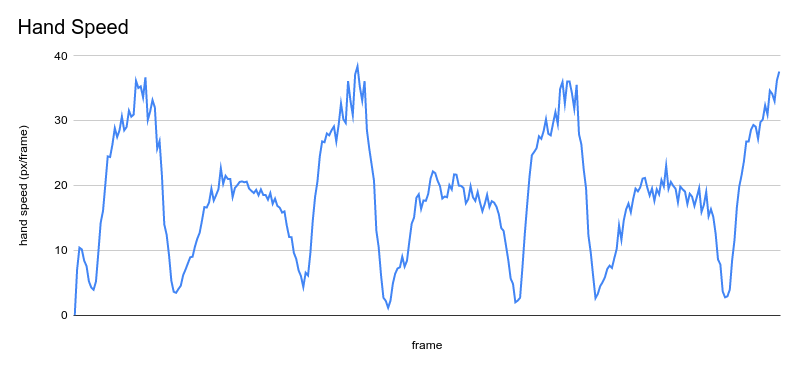
With my smoothing and speed code, it was time to check out hand speed on a pro! Eric Murray, a 2x olympic gold medal rower, posts videos of himself erging on youtube. I grabed a short clip of him erging and ran my code.
The output video looked promising but graphing the hand speed really brought out the speed pattern. The drives are the higher peaks and the recovery are the lower peaks. This indicates lower hand speed during recovery than during the drive, which is good form! You can also see that hand speed increases through the drive and is more consistent during recovery which is also correct.
Thoughts
I had a lot of fun bringing the pretty raw HRNet model into something that could be used fairly easily on a video. What I enjoyed even more was the straightforward math that went into calculating speed, removing outlier keypoints, and even just drawing shapes onto a frame of video. It’s not often that I get to solve cut-and-dry problems like that.
I opened a pull request with the original HRnet repo with a slightly modified inference script and docker environment as they were still in need of demo code. I’m hoping to get that merged soon. It would be so cool to have written the demo/quick-start code for such a successful research project!